Hello Bloggers,
Welcome to my blog today where I will be sharing with you a two piece bedroom set that I made from Laser Cut MDF from That Craft Place.
So here we have it in it's natural form and I have to say that not only am I addicted to wood I am also addicted to the smell of wood, yes I had to go and open the storage box lid again just for one more smell.
This was going to be transformed into a remote, glasses and pen holder and coaster for my butterfly filled bedroom so it was time to make them pretty.
I covered each piece with some Shallow Sea Batch Chalk Paint and gave it two coats just to project it from getting knocked about while looking for the remote in the middle of the night. With the chalk paint there is no need to prime your MDF first and one coat should be enough to give a good covering.
I then cover the pieces in Deco Mache Decooupage Butterfly Papers. I tore the paper into lots of little pieces this is a good job to do while watching TV and once I had enough to cover all areas I took myself back into my craft room.
Using Cosmic Shimmer Sparkle Glue, Seal and Glaze I started layering up the pieces of paper. I love the little bit of sparkle you get with this glue, my bedroom is all about the sparkle. I completely covered the butterfly and the heart both front and back and then lay on a further coat of the Cosmic Shimmer Glue to seal it.
On the remote control holder I covered the back and sides but decided to take some of the sparkle glue over the edges of the paint still showing.
I stuck the decoupaged butterfly paper to the back and the sides of the holder and I cut out some Tim Holtz Butterflies to decorate the sides of the holder with the largest in pink on the right and two smaller ones in teal on the left all of which were covered in lovely gems from my stash. To enable me to use the heart as I coaster I added two coats of Americana Triple Thick Glaze once set this will now withhold hot cups of coffee on it.
All of these products are available from the lovely Lisa and Danny at That Craft Place and they are very happy to look at cutting custom made pieces if you have ideas of your own for a project.
Thanks once again for dropping by my blog please leave me any questions or comments as I do appreciate you taking the time to look at what I am getting up to. If you would like to follow me on my crazy crafting journey feel free to join in.
TTFN
Ria
Followers
Wednesday, 15 July 2015
Monday, 6 July 2015
My Tag Bag
Hello fellow crafter's,
Thank you for dropping in today to take a look at my tag bag that I decorated and had so much fun covering in handmade flowers by Heartfelt Creations. I love making tags and find myself reaching for a tag if my mojo isn't with me on the day that I get to play in the craft room, My problem was, what to do or where to put the tags once they have been made so that is how the bag came in to play.
I have to confess that I can not remember where I bought this paper mache bag from but I just remember loving the shape of it. It is rectangle in shape with the two sides dented in slightly giving it a great shape along with a string handle.
I painted the bag all over inside and out with Americana Decor Chalky Finish Paint in colour Remembrance. I then went over it once dry with one coat of Americana Decor Crackle Medium and left it to dry.
I then went over the outside with Americana Decor Chalky Finish Paint in the colour Lace. You have to not overwork the top coat of paint just load your brush and do one stroke with it and move on. The more paint you put on as the top coat the bigger the cracks you get.
I have to say that this crackle medium is one of the best I have ever used, the cracks started following my brush stokes going from top to bottom of the bag. Once the paint had dried I painted with three coats of Americana Decor Ultra Matte Varnish. I purchased all the Americana Decor products from That Craft Place
I used the Heartfelt Creations Delightful Daisies Dies and Stamps, Botanical Wings Stamps and Dies, Butterfly Medley Paper and Delicate Asters Paper to make all my flowers, leaves tags and butterflies.
I also decorated a large peg from That Craft Place with some papers and added a large wooden butterfly to it and covered it in gems from my stash. I am very please with how the flowers turned out, I really enjoy making up Heartfelt Creation Flowers they can be shaped to look like so many different flowers.
I hope you have enjoyed this step by step and would be happy to answer any questions that you might have and would love to hear any comments you have on my project. I appreciate you all visiting my blog and would love you to let me know you stopped by.
Have a great week in this lovely weather whatever your plans are.
Ria
Monday, 29 June 2015
Fathers Day Gift Plaques
Good morning Crafters,
It is a bright warm sunny day as I sit and write this enjoying the sound of the birds singing. I hope whatever it is you are doing is as enjoyable for you.
I am going to give you the breakdown on how I made two different plaques that I used DecoArt products on mainly and some Crafty Notions rusting.
The plaques have been cut by Lisa and Danny at That Craft Place Ltd and are the best quality of laser cut MDF that I have found.
I will start with my very rusty Worlds Best Daddy plaque first as this was so much fun to make and the end result in the flesh was amazing.
I started by painting the MDF with Black Gesso and once dry I then used DecoArt Crackle Embossing Paste. I left this to dry naturally as heat drying it could cause it to bubble up.
Once the embossing paste was dry I used the DecoArt Black Mister and sprayed all over the plaque but not trying to cover it all just giving it a sort of dusting of black splatters over it. Once this was dry I then covered it with DecoArt Quinacridone Gold.
Here you can see how the quinacridone gold starts to make this piece look rusty and old and the embossing paste gives such a great texture to it.
These are all the pieces I made rusty using DecoArt Sand Embossing Paste, Back Gesso, Titan Buff fluid acrylics and Quinacridone Gold. These pieces are brand new nails, screws, Keys, wood, grey board, metal and glass tiles.
These pieces were made rusty using Crafty Notions Wax Acrylic, Rusting Powder and Vinegar. These are all wood or grey board and they looked and felt so old and rusty in the flesh. I love that I have also been left with bits of cheese cloth that have lots of lovely rusty marks on it ready to be used on another project.
This is the back view of the plaque and I am so pleased that my Dad now has this and loves it and he has put it on show and will never be taking it down. This was such a fun project to do it was amazing to see what was paint or powder turn in to what looked like years old rust, totally amazing.
I also used Patina Paints in Verdigris, Moss, Jade, Cinnabar and Rust to give the patina look.
This is the second plaque that I did for Lisa and Danny at That Craft Place Ltd and this time I painted it with black gesso. When this was dry I took a few of the DecoArt Fluid Acrylics in yellow, orange and green and painted these colours over the whole piece with the No1 Dad and stars stuck down. Once dry I went over the whole thing with DecoArt Crackle Paint and left it to dry naturally.
I then used the DecoArt Fluid Acrylics in Primary Yellow, Green Gold, Cadmium Orange Hue, Cadmium Red Hue and Cobalt Teal Hue. I allowed these paints to run from the top of the plaque spritzing it with water to help the paint move. I then turned it upside down and did the same from this end moving it with water.
I took a black pen around the edges of the No1 Dad and Stars and then covered the whole thing in a couple of coats of DecoArt Matt Varnish to seal it all.
So there you have my two Fathers Day Plaques laser cut at That Craft Place Ltd and decorated using DecoArt products and Crafty Notions Rusting products.
Thank you for taking the time to come by my blog to find out how these were made, if you have any questions please feel free to ask and I will answer as best I can. I appreciate you taking time out of your day to visit my blog please leave a message so that I know you have been here.
TTFN
Ria xxxxx
It is a bright warm sunny day as I sit and write this enjoying the sound of the birds singing. I hope whatever it is you are doing is as enjoyable for you.
I am going to give you the breakdown on how I made two different plaques that I used DecoArt products on mainly and some Crafty Notions rusting.
The plaques have been cut by Lisa and Danny at That Craft Place Ltd and are the best quality of laser cut MDF that I have found.
I will start with my very rusty Worlds Best Daddy plaque first as this was so much fun to make and the end result in the flesh was amazing.
I started by painting the MDF with Black Gesso and once dry I then used DecoArt Crackle Embossing Paste. I left this to dry naturally as heat drying it could cause it to bubble up.
Once the embossing paste was dry I used the DecoArt Black Mister and sprayed all over the plaque but not trying to cover it all just giving it a sort of dusting of black splatters over it. Once this was dry I then covered it with DecoArt Quinacridone Gold.
Here you can see how the quinacridone gold starts to make this piece look rusty and old and the embossing paste gives such a great texture to it.
These are all the pieces I made rusty using DecoArt Sand Embossing Paste, Back Gesso, Titan Buff fluid acrylics and Quinacridone Gold. These pieces are brand new nails, screws, Keys, wood, grey board, metal and glass tiles.
These pieces were made rusty using Crafty Notions Wax Acrylic, Rusting Powder and Vinegar. These are all wood or grey board and they looked and felt so old and rusty in the flesh. I love that I have also been left with bits of cheese cloth that have lots of lovely rusty marks on it ready to be used on another project.
This is the back view of the plaque and I am so pleased that my Dad now has this and loves it and he has put it on show and will never be taking it down. This was such a fun project to do it was amazing to see what was paint or powder turn in to what looked like years old rust, totally amazing.
I also used Patina Paints in Verdigris, Moss, Jade, Cinnabar and Rust to give the patina look.
This is the second plaque that I did for Lisa and Danny at That Craft Place Ltd and this time I painted it with black gesso. When this was dry I took a few of the DecoArt Fluid Acrylics in yellow, orange and green and painted these colours over the whole piece with the No1 Dad and stars stuck down. Once dry I went over the whole thing with DecoArt Crackle Paint and left it to dry naturally.
I then used the DecoArt Fluid Acrylics in Primary Yellow, Green Gold, Cadmium Orange Hue, Cadmium Red Hue and Cobalt Teal Hue. I allowed these paints to run from the top of the plaque spritzing it with water to help the paint move. I then turned it upside down and did the same from this end moving it with water.
So there you have my two Fathers Day Plaques laser cut at That Craft Place Ltd and decorated using DecoArt products and Crafty Notions Rusting products.
Thank you for taking the time to come by my blog to find out how these were made, if you have any questions please feel free to ask and I will answer as best I can. I appreciate you taking time out of your day to visit my blog please leave a message so that I know you have been here.
TTFN
Ria xxxxx
Sunday, 12 April 2015
Change / Alter
Hello Crafters,
Thank you for dropping in today to take a look at the Design Team Challenge over at That Craft Place Ltd. Our brief this week was change/alter and although I had a lot of ideas going through my head of things in the craft room that I could alter, I really wanted to have a go at making rust.
I did a workshop in March at That Craft Place which was run by Andy Skinner and I am a big fan of his works. He showed us at the workshop how to create rust using Decoart products and I needed a bit of a play in my craft room.
So as you can see I decided to make a card but I used Foam Board and made it rusty. I had seen foam board in the shops but wasn't really sure how to use it and I knew that Andy used it in his projects so I was thrilled that he bought it along to the workshop for us to use. Of course I had to go straight out and buy some in both black and white.
Using a Tim Holtz die I cut out two hinges, a keyhole and a key and these were going to become my rust babies. To make the rust you first have to cover your pieces in some Decoart Texture Sand Paste and leave to dry.
While this was drying I spritzed a piece of card lightly with some Decoart Carbon Black Mister and put that to one side to dry. When the texture sand paste was dry I used some Black Gesso and some Decoart Titan Buff Fluid Acrylics with a bit of cut and dry foam and mixed the two colours together to create a grey colour to add to the cut out pieces. Again this was left to dry at no point did I use the heat tool as I didn't want any bubbling and I wasn't sure if the foam board would melt or not, (I will have a go another time and see how the board stands up).
I then started working on my card topper which was a piece of white card cut to 7.5"x 7.5" using my distress inks. I used vintage photo, spiced marmalade, ripe persimmon, tumbled glass and evergreen bough. I kept working these colours in until I was happy with how the background looked and then started using background stamps and black archival.
All of my deocart products, the word stamps, some of the background stamps and some of the embellishments came from That Craft Place.
The piece of card that I had spritzed earlier was given a coat of Decoart Quinacridone Gold and when dry I stamped the words on to the card and cut to size. I love how these have come out, you have to make sure you do not cover the card completely in the black mister just a gentle spritz.
When the board pieces were dry they were given a coat of the quinacridone gold and left to dry. This is the stage where it really starts to look like old rusty bits of metal it has great texture and detail that I find myself in love with the result. I wish you were able to pick the pieces up and feel them.
I used a bit of Decoart Cobalt Teal Fluid Acrylics to rub in areas of the rust and I used some with a stamp to make it look like a can had been sitting in it leaving a ring of the colour behind.
The edges of the topper card were distressed using the Tim Holtz distressing tool and I gentle curled a couple of the edges to make it look older and more distressed.
So there you have it my entry for this week and although it is not an altered object I think that taking a white piece of card and making it look so aged and distressed added with my pieces of faux rusted metal it can fit the brief.
I hope you like it and if you do drop by to take a look please do leave a comment about your thoughts on the piece. I appreciate the effort you all make going through our blogs and it is nice if we can say hi back to you. Don't forget that you can also take part in this challenge with the chance of winning and all the design teams work is on the blog to give you inspiration.
TTFN
Ria
Friday, 3 April 2015
Happy Birthday Trudie
Hello Trudie,
I am sure that you are having an amazing time with your family today on your 40th Birthday and a complete surprise that we are all joining in on your birthday.
I started this card with a piece of white textured card and inked it up using Ripe Persimmon Distress Ink. Then using a text stamp and Black Archival ink I stamped over the entire piece of card.
Once this was dry I started cutting my pieces of paper into strips. These were off cuts that I had left from some 12"x 12" sheets of paper and where I took the orange colour from for the additional elements.
I managed to cut a square from one piece which I turned to form a diamond and to this diamond I added a black and white picture I had of a girl on a garden swing. To pull the picture into the card I used the distress ink to colour just her hat. This meant that the black and white picture with the orange hat went with the orange background with the black stamped text.
I lay all the strips out on the front of the card to decide where I wanted them to go, stuck them down adding the diamond on top. I had the cream flowers in my stash and I took some of the distress ink over them so that they tied in. I also added the number 40 using Cosmic Copper ink.
This card is a great example of why as crafters we find it difficult to throw anything away. I loved these papers and the colours in them when I bought them and I just couldn't throw the left overs away after using them on another project. Paper piecing is a great way of making use of all those bits we have and love.
Trudie I hope the card arrived with you in time for your birthday and that you have a birthday that you will never forget. You have a lot of friends that love you very much and it has been amazing getting to know you and to share this moment with you.
Happy Birthday Sweetie have fun and hope to see you in May.
Love and Hugs
Ria
P.S. As Suzie does not have a blog I have said that I would love to share my blog with her so here is the wonderful card that Suzie made for you Trudie.
Yah well done Suzie you are now a blogger xxxxx
Sunday, 29 March 2015
Easter Design Team Piece
Hello you lovely people,
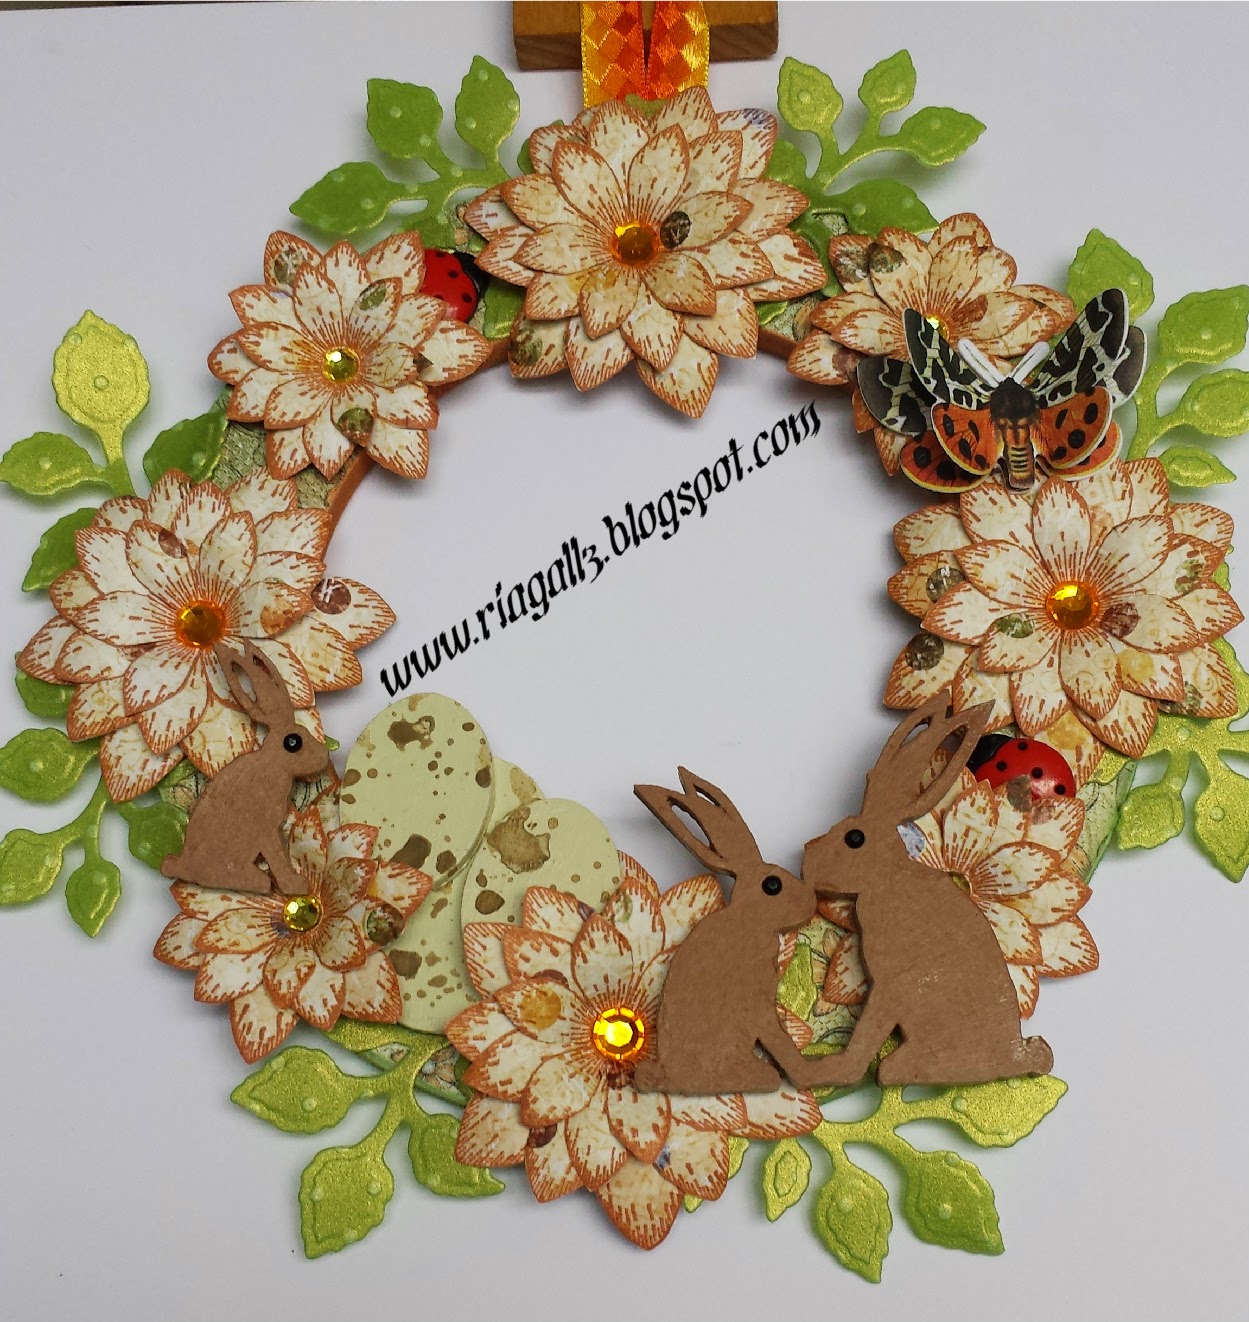
Today it is Easter over at That Craft Place Ltd and my design team piece is an Easter Wreath.
I started this wreath with an MDF ring that had been laser cut at That Craft Place along with the Bunnies and the Eggs.
I covered the ring in some papers from Heartfelt Creations both front and back cutting away the centre piece. I sanded the edges and then ran ink pads around the inside and outside of the ring.
I put a coat of distress paint on the bunnies and the eggs and left them to dry. While these were drying I started stamping and cutting out the flowers and making them up after shaping the petals with my ball tool and a foam mat. The leaves were cut from embossed vellum using a heartfelt creations die.
I ran a lighter colour of distress paint around the edges of the bunnies to make them stand out and gave them all black gems for eyes.
I used a slightly darker distress paint and watered it down so I could splatter it on the eggs to make them speckled.
I attached all the flowers and leaves to the wreath and then slid in two ladybirds and a pretty little butterfly and finished off by adding the bunnies, eggs, gems and the ribbon at the back to hang it up.
At That Craft Place you can order/buy so many amazing laser cut embellishments to use on your projects and they really add lots of depth to your pieces.
I would like to thank you for coming over to my blog to see what I have been up to and it would be lovely if you would leave a comment or ask any questions.
I hope you all have a lovely Easter weekend when it gets here and that the weather and life is good to you.
Ria
Sunday, 15 February 2015
Movies Design Team Challenge 15/2/15
Hello Bloggers and fellow crafters,
Well it is Design Team Challenge time over at That Craft Place Ltd and the title this time is Movies. I wasn't sure where I was going to go with this but my good old mono mojo jumped out at me and here is my entry.
I started with a laser cut MDF frame with backing, a laser cut grey board film strip and some monochrome papers all from That Craft Place.
The frame and backing were given a coat of gesso and then painted using white acrylic paint and a piece of cut and dry foam, I have a thing about not liking brush stroke marks so often use cut and dry foam to add my paint.
I printed the picture on to smooth card and then covered it in triple thick gloss varnish for a high sheen.
I covered the film strip in black paint and then threaded a piece of actual film through the strip. That's my bonus having a daughter doing photography at University she always has a bit of film spare for her mum.
I added gems to the film strip and little black gems around the frame. The words were typed on my laptop, printed, cut down and then squiggly lines drawn around the edge of each word.
So there you have it my entry for the movies challenge, I hope you will all join in with the design team and add your entries to the list so we can pick some winners.
Thank you for visiting my blog, please feel free to leave a comment to let me know what your thoughts are and you are welcome to follow me on my crafting journey if you so wish.
Hugs Ria
Sunday, 1 February 2015
That Craft Place Ltd DT Challenge 1/2/15
Hello Bloggers,
Today I will share my make for the anything goes challenge over at That Craft Place. If you go over to the blog you will see the work by the Design Team members and have the chance to enter the challenge also.
This project has been made using the DoCrafts French Lavender Capsule Collection and some flowers and gems from my stash available from TCP.
I started with a black 8"x 8" card and cut a sheet of the capsule paper to 7.5"x 7.5" and went around the edge of the page with my dusty concord distress ink. Next using a mask I used the dusty concord and shaded lilac distress ink to leave the diamond pattern on the paper.
I placed a tag inside my vintage embossing folder and ran it through my ebosser. Once embossed I used dusty concord, shaded lilac and milled lavender distress inks to go over the embossed words. I did this twice drying with my heat tool in between coats of ink.
Once the ink was dry I carefully went over the tag with gloss medium trying not to move the ink on the card. I used a sponge applicator and went straight up and down. When this coat was dry I applied a second coat going in the opposite direction and there is no need to worry about the ink moving as the first coat has sealed it and made it waterproof.
I painted a wooden laser cut heart with some purple paint and when that dried I stuck the self adhesive crochet border around the edge of the heart. Using pinflair glue I stuck down some flowers and leaves from my stash.
Before sticking the sheet of paper to the card front I wrapped around the jumbo crochet trim down the middle of the paper securing it on the back with double sided sticky tape.
I finished this card off with gems and raffia and the use of one of the die cut notelets on the inside of the card.
These capsule sales are great value for money if you have a lot of quick cards to make or if you want to make box sets of cards as you get everything you need to make multiple cards but with the ability of changing the look of each card with just the use of some inks, masks and embossing folders.
I hope you will join us over at the blog challenge and share your craft with us, as it is anything goes it really is all in your hands.
Thanks for dropping by it is lovely to have your company and I would love to hear what you think about my card.
I will be doing another blog post during the week showcasing a faux metal book I made and then used papers designed by Lisa at TCP to sit between the covers.
TTFN
Ria
Sunday, 4 January 2015
That Craft Place DT 4th January2015 - Mono
Hello Bloggers,
It is time for another That Craft Place Design Team Challenge, the first one of the year and the theme for this challenge is Mono.
People that know me know that I love anything Steampunk and today I have steampunk with a difference as this one is very girlie.
For all my cards that I make I decide what size it is going to be in this case 8"x 8" and I cut another piece of card to the same size. This piece of cut card is what I work on when building my card and once built this is then glued on to the main card. By working in this way, if something were to go wrong with what I was doing or if I had a spill or damaged the piece I am working on it means only a single piece of card gets thrown away and not a full actual card.
For this card I have used a set of stamps by Chocolate Baroque called Punky Romance. This set of stamps are so pretty and there are so many stamps that I know these will be used over and over again.
I started by gently blending distress inks on to the background of the card using Victorian Velvet and Worn Lipstick. Once the background was coloured I then did some faux bleaching by flicking water onto the ink, leaving it a minute and then blotting it which lifts some of the ink.
I stamped all the images on to the base card using Plum Archival Ink and then stamped them all again on another piece of card which has also been coloured as above so that these could be cut out and used to layer on top of the base card.
I raised the cut out pieces using foam pads and I bent the butterflies and just used glue down the middle of them so that their wings lifted up giving depth to the card.
The card was finished off by adding some gems to the centre of the flowers which added a bit of sparkle.
The items used to make this card are available from That Craft Place they have a great stock of card, inks, stamps and many other items. It is a proper shop but they have the ability of being able to sell the shop items to you through Facebook.
Thank you for stopping by my blog and taking a look at how I made my DT piece, please do leave a comment to let me know your thoughts on my make and to let me know you dropped by.
I hope you will take a look at all the other Design Team Posts to see what they made of the mono challenge. It would be great if you would like to take part as well and enter your project for us to see.
TTFN
Ria
Sunday, 21 December 2014
That Craft Place Challenge 21st December 2014
Hello Bloggers,
Well it is time for another challenge over at That Craft Place and this time it is Anything Goes.
I have produced a card built up with layers of inks through different stencils/masks and a wall hanging using images on torn tissues and napkins.
This card is 8"x 8" and has been made by layering up different distress inks through different stencils/masks keeping the card flat.
I started with a black card and on that layered a piece of printed card that I had in my stash. I then cut down a smaller white piece of card and using the fantastic masking tape from TCP held down a mask from Creative Expressions. I used three different blue distress inks and one of Barbara Gray's brushes to lightly brush the ink through the mask in different directions,
Once I removed that mask I used a splat and cup stain mask and went through that with green ink in different areas using cut and dry foam. I then used pumice stone distress ink to put down the words Inspire and Dream from Lisa's new laser stencils.
The idea of this card was to build the card up with layers but keeping it flat to allow the butterfly to really stand out. The butterfly has been cut from the new Tim Holtz die with an embossing folder included with it so that the wings can be embossed on acetate. I finished the card and butterfly off with gems from my stash,
A note about the masking tape sold by TCP it is in my opinion one of the best I have ever bought or used. It is so low tack that there is no fear of it tearing your work as you peel it off but sticky enough to hold your card, mask or anything else in place.
My second piece for the challenge is a wall hanging which has a lovely touch of spring about it to brighten up our damp cold days.
I started with a paper mache wall hanging which I gave a cover of white gesso using cut and dry foam to apply. I always use cut and dry foam to apply gesso and paints as it prevents the brush marks and the odd brush hair.
Once dry I used some distress paints and americana paints to cover both front and back of the wall hanging. I applied the paints to the wall hanging and then used a mister to spray with water and allow the paints to run and mix with each other.
I had a napkin with birds on it so I carefully tore around two of the birds and made sure the image was only one ply. I coloured a small white canvas using gelatos and blended the colours with my fingers. I took a normal tissue from a box and separated it down to one ply and stamped the quote on to it using archival ink. You must remember to dry your stamped image with a heat tool as archival ink has an oil base and this could smudge if it is not dry properly.
I applied the bird images and the quote using mod podge and then I finished decorating it with flowers and a butterfly that I stamped and cut out, I ran my black soot distress paint around the edges of the wall hanging to frame it.
The items used in these projects can be purchased from That Craft Place along with much more lovely crafting stash.
Thank you for dropping by to take a look at my challenge entries, I hope you have joined in with us on this challenge as it is open to everyone.
TTFN
Ria
Well it is time for another challenge over at That Craft Place and this time it is Anything Goes.
I have produced a card built up with layers of inks through different stencils/masks and a wall hanging using images on torn tissues and napkins.
I started with a black card and on that layered a piece of printed card that I had in my stash. I then cut down a smaller white piece of card and using the fantastic masking tape from TCP held down a mask from Creative Expressions. I used three different blue distress inks and one of Barbara Gray's brushes to lightly brush the ink through the mask in different directions,
Once I removed that mask I used a splat and cup stain mask and went through that with green ink in different areas using cut and dry foam. I then used pumice stone distress ink to put down the words Inspire and Dream from Lisa's new laser stencils.
The idea of this card was to build the card up with layers but keeping it flat to allow the butterfly to really stand out. The butterfly has been cut from the new Tim Holtz die with an embossing folder included with it so that the wings can be embossed on acetate. I finished the card and butterfly off with gems from my stash,
A note about the masking tape sold by TCP it is in my opinion one of the best I have ever bought or used. It is so low tack that there is no fear of it tearing your work as you peel it off but sticky enough to hold your card, mask or anything else in place.
My second piece for the challenge is a wall hanging which has a lovely touch of spring about it to brighten up our damp cold days.
I started with a paper mache wall hanging which I gave a cover of white gesso using cut and dry foam to apply. I always use cut and dry foam to apply gesso and paints as it prevents the brush marks and the odd brush hair.
Once dry I used some distress paints and americana paints to cover both front and back of the wall hanging. I applied the paints to the wall hanging and then used a mister to spray with water and allow the paints to run and mix with each other.
I had a napkin with birds on it so I carefully tore around two of the birds and made sure the image was only one ply. I coloured a small white canvas using gelatos and blended the colours with my fingers. I took a normal tissue from a box and separated it down to one ply and stamped the quote on to it using archival ink. You must remember to dry your stamped image with a heat tool as archival ink has an oil base and this could smudge if it is not dry properly.
I applied the bird images and the quote using mod podge and then I finished decorating it with flowers and a butterfly that I stamped and cut out, I ran my black soot distress paint around the edges of the wall hanging to frame it.
The items used in these projects can be purchased from That Craft Place along with much more lovely crafting stash.
Thank you for dropping by to take a look at my challenge entries, I hope you have joined in with us on this challenge as it is open to everyone.
TTFN
Ria
Sunday, 7 December 2014
DT Challenge 7th December - Christmas
Hello all you lovely people,
Well today it feels a lot like Christmas at That Craft Place Challenge and everything is looking lovely and festive.
I decided not to go with the traditional Christmas colours for my DT piece but instead us cool winter icy colours.
I used a flat canvas which I painted using Americana Decor Paint in colours Lace and Serene bought from TCP. This was my first time of using these paints and my word for them is, LUSH. They are lovely and creamy, come in 8fl oz tubs and go on to surfaces like a dream.
Once the canvas was dry I used some Mod Podge and stuck down some screwed up Tim Holtz music tissue paper and left to dry.
I painted the whole of the MDF laser cut Believe in the magic of Christmas and snowflake plague from TCP in the lace colour. Once that had dried I then painted the actual words on the plague in the serene colour.
I then masked off all the snowflakes so I could use a music stamp I had and stamped on the words using Archival black ink. Next I masked off the words and used Crafter's Companion Silver Spray & Sparkle all over the snowflakes.
I stuck a sparkly gem in the centre of each of the snowflakes and then stuck the laser cut MDF piece on to the canvas. At this point I was not too impressed with it, something was missing. I took out my Black Derwent Charcoal Pencil and a small paint brush and went around the outline of each letter to highlight it, which in turn made the whole piece come together.
So there you have it, my entry to the Christmas Challenge in the form of "Believe in the Magic of Christmas".
Thank you for stopping by to take a look at my blog entry, please do leave a message to let me know what your thoughts are on my project or just to say Hi. I appreciate you taking the time to come over to "Home is where My Art" is and if you would like to join me on my crafting journey please feel free to follow me.
Big Hugs
Ria
Friday, 24 October 2014
Delicate Asters Book
Hello Friends,
Today I am sharing with you a pretty little 6"x 6" Laser Cut Grey Board Book that came from That Craft Place Ltd
Lisa has been turning out some really lovely pieces from her laser cut machine and welcomes any orders/requests for items you would like cut. I decided to use one of her 6"x 6" grey board books which came with a laser cut flower that looked a little like an aster.
I also used these other pieces that she sells in packets of two's, three's or a number that you require.
I put the cut pieces together with my Heartfelt Creations Delicate Asters set of stamps, dies and papers and set about creating a little book with secret pockets and tags.
I started by covering the front, back and inside pieces of the book with cut down papers and stamped on the papers in different areas.
I used the papers to cut out some of the flowers and built them up to become the delicate asters, I also cut out some of the little flowers and stuck those to the stamped blossom tree on the inside of the back cover.
I coloured the little grey board pieces with distress inks and used a mask cut by Lisa to put the dots on the umbrella. I layered the flowers up on top of the leaves that I cut out using the die.
I then started cutting out pages to put in the book from the 12"x 12" paper pad and used some of the sentiment panels to make little pockets and placed tags in them.
I felt that the back cover deserved to be as pretty as the rest of the book so it has a 3D butterfly that I stamped and cut out and I used some lovely quote stamps through the book.
In the picture fourth from the top you can see a vellum page with a butterfly on it. These I believe came from a Kanban kit and I put one vellum page between each heartfelt creation page just to add a different look and texture to the book.
This book will be going on show in That Craft Place shop for customers to look at and to give them inspiration for the laser cut books.
Thank you for dropping in today and taking a look at this pretty little book, I hope it has given you some inspiration for a project. Please do leave me a comment to let me know you dropped by and what you think about the book. If you like what you see and would like to join me on my crafting journey then please feel free to follow me.
Thanks
Ria
Thursday, 9 October 2014
Christmas Stocking
Hello Blog Friends,
Welcome to my blog, I hope you are all well having fun and not letting this winter weather get to you too much.
As we are now starting to feel more like winter I thought it would be safe to share with you a winter make that I have done for That Craft Place
I have to apologise as I forgot to take a photograph of this in it's naked state. It has been laser cut by Lisa out of MDF and comes in two pieces, the red part and the white part that you can see at the top of the stocking and they both have a hole cut in the top right hand corner.
I started by covering both pieces back and front with White Gesso and dried using my heat tool. Once dry I covered both pieces with Maimeri Light Modelling Paste as well as attaching some screwed up Tissue paper in areas on the stocking to give it extra depth.
The next stage was the hardest, waiting for it to dry! I am not the most patient of people and have a habit of sticking my finger into things to see if they are dry yet.
Once I had given the modelling paste the correct time to dry I started painting the red area. I used Paper Artsy Fresco Finish Chalk Acrylics in London Bus red and in a few areas I added in just a tiny amount of black to again give the stocking depth and shading. I gave the front two coats of paint using a paint brush and the back two coats using a piece of Cut and Dry Foam.
I used White Acrylic Paint for the top piece and once this was dry I applied two coats of Crawford and Blacks Glitter Paint.
The Snow Woman was laser cut from Grey Board by Lisa and comes in a packet as a MR & Mrs. I covered the three pieces with white gesse and then when dry I went over the body with the glitter paint. For the hat I used a Glitter Glue that I found in my stash and finished this little lady with other items from my stash.
The Snowflakes are laser cut from MDF and were given the same treatment of white gesso and glitter paint.
I wanted to have some wrapped presents coming out of the top of the stocking and spent a night thinking of how this could be achieved (instead of sleeping, which I don't do much of anyway).
I decided to make two small boxes and filled the inside of these with tissue paper to give them more strength. I then wrapped them in tissue paper and created little tags for them. I then put two pieces of Centura Pearl Card together for strength and cut a slit in the side of each box. I covered the pieces of card with glue and pushed them into the slit I had made and left enough card sticking out so that it could be glued between the red stocking and white top pieces of MDF.
I finished the whole thing off with some Christmas bits from my stash and some Polar Flower Soft. The Merry Christmas Sign was from one of the stamps I have in my Christmas Crafting Box.
I don't know how any of you store your Christmas Crafting Stash but I found it didn't belong in with my everyday stash so I decorated a box and anything that is to do with Christmas is put in that box and then put well out of the way once it is no longer needed. For me that works but I would love to hear from you about how you store your Christmas crafting stuff.
Thanks once again for dropping in on my blog and taking a look at what I have made and how it was done. I do hope a Christmas Project has not got you stressed or worrying about how much you have to do.
Please do leave me a comment to let me know you have dropped by and please feel free to follow me on my crafting journey if you like what you see.
TTFN
Ria
Sunday, 28 September 2014
DT piece for That Craft Place - door hanger
Hello Blog Friends,
Well it has been some time since I last blogged, that has been due to a number of things. My health has taken a bit of a bashing and is taking time to get my head around that.
I also found that so many of my posts had lost some or all of the pictures I had used and this was upsetting because I had worked hard on them. I decided to go right back to the start of my blog and delete any posts that had lost pictures. As so many of you had started to follow my blog I didn't want to start a new one and loose all of you.
So the situation at the moment is that I am still on the design team for Sheena Douglass but I am also now on the design team for Lisa Ditzie Horton at That Craft Place.
Lisa will be sending me MDF and Gray Board laser cut shapes for me to decorate and these will then be placed in her shop to give inspiration for others.
This is my first piece that I have done for That Craft Place using a laser cut door hanger and Heartfelt Creations Papers and Stamps.
I started by giving both sides of the hanger a coat of White Gesso to make it easier to glue the papers to.
I have used The Classic Sunflower Collection 12"x 12" paper pad and the stamps that go with this collection. I am a big lover of sunflowers I believe they are very happy flowers and make you feel like smiling when you see them.
Using some Slap it on Matte Glue I covered the front and back of the hanger with different papers from the pad, both had the spotty design on them. I cut the middle hole out of the papers once stuck down and then I sanded along all the edges of the hanger to give a neater finish.
I used Archival Dandelion Ink on a piece of Cut and Dry Foam to go around the edge of the hanger and used the same ink to stamp the Classic Sunflower twice. I used the large die that cuts out all the flowers, seeds and ladybirds.
The single Sunflower Stem was stamped direct on to the paper using Archival Jet Black Ink. This was then coloured in using my Tim Holtz Distress Pens. The two sunflowers were coloured using Archival Dandelion and Orange Ink pad and Distress Pens.
I layered the flowers up and used Brown Flower Soft for the centre of these flowers and the one that has been stamped. The leaves were stamped and cut from the Bold Leaf set of stamps using Archival Fern Green ink pad.
The Butterfly was stamped from the Summer's Day and Sunflower Stem set of stamps and again coloured in using Distress Pens. Once the butterflies were layered up I used Mustard Seed Distress Stickles on the wings
The string of pearls are from my embellishment stash and were stuck around the hanger using Cosmic Shimmer Glue. I used one of the litter tickets from the paper pad that says "Just a Note" and on the back of the hanger I used the stamp that says "The flowers of tomorrow are in the seeds of Today".
I added a little piece of lace from my stash and then I created the bow using some orange and yellow ribbon. I have added some of the seeds at the bottom of the hanger along with one of the ladybirds cut out by the die.
Thank you for taking the time to come back and look at my blog and I hope you will leave me a comment saying what you think of my creation. I will be back on my blog a lot more now so if you feel like joining me on my creative journey please come along for the ride.
TTFN
Ria
Sunday, 11 May 2014
Faux leather book,
Hello Blog Friends
Today I am going to give you a sneak peak at the other projects I made using the New Embossing Folders by Sheena Douglass which she will be working with tomorrow on Create and Craft at 9am and 3pm.
The front cover of the Faux Leather book I made using one of the new folders. The flowers were coloured using the Silks paints.
The back cover of the book made using a second embossing folder. I stitched a large button to the front and back cover. glued a large flower on the front one and used elastic to hook around the two buttons to keep the book closed.
The inside of the book covered with fabric and then a small envelope and tag stuck inside. I used the two embossing folders to emboss the pages on the left hand side of the book as shown in this picture.
This is a box that I have made using black card the elephant embossing folder and then going over the raised area with gilding wax.
Last but not least this card I made using a beautiful 5"x 7" embossing folder and I used my distress inks on it and cut some of the flower out to give lift and shape. I also cut out some extra flowers from the folders and used a Sheena sentiment and a tattered lace die for the bird.
Make sure you tune in to Sheena's two shows tomorrow at 9am and 3pm and you will get the chance to watch Sheena use her folders using lots of different techniques, shows not to be missed.
Thanks for looking in I would love for you to leave a comment letting me know what you think and I can give further details on my makes if you want them.
Ria
Friday, 9 May 2014
Elephants and Arches
Hello Bloggers,
Today I am going to talk you through a card I have made using one of the new Sheena Douglass embossing folders.
I started with a piece of black card cut to 5"x 7" and put it through the embossing folder with the crosses on it and ran it through my eBosser. Once embossed I then applied some Renaissance Gilding Wax over the raised area.
I cut a piece of kraft card as a matt and then on a slightly smaller piece of kraft card I used the arches embossing folder. I ran some glycerine over the smooth side the folder placed the card face down and embossed it.
Once embossed I covered the areas made wet by the glycerine with black embossing powder and heated. The raised area that was left was painted with a gold H2O.
I used some black card and again used glycerine on the smooth side of the elephant embossing folder and once that was embossed I covered it with gold embossing powder and heated. I cut two of the elephants out and used glue gel to raise them slightly.
The sentiment was stamped using black archival ink on kraft card and cut out using frame one D-Lites die. I went along the edges with the gilding wax.
If you tune in to Sky on Monday at 9am and 3pm you will catch Sheena doing her wonderful techniques using her new embossing folders.
Thanks for dropping by please do leave a comment and be sure to check out the rest of the samples made by the other inkoids and Sheena herself.
Ria
Sunday, 27 April 2014
It's time I was back here
Hello you lovely people,
I can not believe that I have not blogged since the end of January and feel ashamed and sad because I have really missed you all. Some of you know that my health had not been at it's best and I was desperately trying to get well enough to go and visit my Dad and family in New Zealand.
Well I am happy to report that not only did I get to New Zealand but that I had the time of my life with my dear Dad, my Auntie Edna whom I speak to on the phone every week but have never met, she is 87yrs old and her and I have a lot of things in common. My Uncle Barry and Auntie Carol travelled over from Australia to meet me for the first time also, so there I was surrounded by my family the only people missing were my two children and my amazing sister Tina who lives in York.
I had my birthday while I was in New Zealand and we were all together to celebrate that, the memories will be with me forever. My Dad threw two birthday parties for me, one in Rotorua where he and Auntie Edna live and one in Auckland which is where my Dad was living when I first found him after 30yrs of not knowing where he was or anything about him.
The long journey to and from New Zealand were very hard going for me and took it out on my poor old body but the holiday was so worth the pain and discomfort.
The hot air balloon was my birthday present from my Dad, he knew it was the last thing on my wish list which I had drawn up as a teenager. I had honestly told myself that sadly it was something I would never be able to achieve now that my health was going down hill. The firm that run these hot air balloon rides are one of New Zealand's finest companies and so professional. They were so helpful to me and made sure that this ride was one that I could do with their help.
My Dad and I both cried on this day, I because I was living my dream and my wonderful Dad had made it all possible for me and my Dad because he knew just how much this meant to me. Oh boy what a day one that will live with us both forever. The Champagne breakfast that followed was also very special and finished off this fantastic day for me.
I now have two scrapbooks to make one all about my family that had been kept from me for those 30yrs before I was able to trace my Dad, I have bought old photo's and original documents back with me to use. Plus I will be doing a scrapbook on my holiday in New Zealand full of all the wonderful friends I made while there and of all the amazing places I visited. I may show some of this on my blog as it takes shape but it is something that will take time as scrapbooking is a new thing to me.
I now intend to get back to crafting and sharing with you all the things I am working on and making. I am looking forward to getting back to our Wednesday WOYWW as boy have I missed seeing all your desks.
I hope you will stick with me and encourage me to get back into doing what I love most, getting covered in ink and paint with a great project at the end of it.
Take care for now and keep watching this space for project and joining me on my journey.
TTFN
Ria
Sunday, 26 January 2014
Another look at what I have been up to
Hi Bloggers,
I didn't get time to blog about the cards I put on Facebook over the last couple of days so I will share them with you today.
This card was made by using the embossing folder twice which you would normally do to continue the pattern but I was really surprised that this one looked like it had been done using the one embossing folder.
The background for this card was the ink that was still left on my craft mat after using it to make another background. I had used my distress ink pads to put ink down on my craft mat and spritzed with water and took a piece of card through the ink. I then dried that piece of card, spritzed again with what was still on the mat and took my piece of card through it again. Once I was happy with the background I was working on I decided to use a spare piece of card and soak up the last of the ink on it.
This background was made up of going through the left over ink of about 8 different backgrounds I worked on.
Once I had embossed the card I took my StazOn ink pad over the top of the raised areas to make them stand out. Once I was happy with that I then started to work different colours of distress ink in to the piece . I cut the railings from a spellbinders die from kraft card and went over it with key lime radiant rains.
This card was made using the same folder but only used once. The background was built up using the metallic pan pastels. The background was black card that was put through an embossing folder and then covered with clear embossing powder and heated twice to give a glossy finish to it.
This card was made using one of the new embossing folders and some of the flower stamps that go with the new folders. I used centura pearl card to put through the folder and then went over it with pan pastels. Once I was happy with the build up of colour I took the ice silks over it to seal the pastels but to also give the piece some wonderful bling.
The flowers were stamped on to some centura pearl card that had been covered in the silks, cut out given a bit of shaping and then a pretty pearl was added to the centres. The panels were cut and layered on to a sheet of card that started with a dark pink colour and went down to a light pink.
Well it is only one more sleep and then it will be time for Sheena's four day deals with these wonderful embossing folders, 12 of them in total and I am sure you will want them all. Be sure to tune in to watch the Master of Stamping at work and press record so you can go back to look at her techniques.
TTFN
Ria
Thursday, 23 January 2014
Sheena Douglass - New Embossing Folders
Hello Bloggers,
I have been shut away in my craft room busy working on my DT pieces and we have now got to the stage where we can start giving you a sneak peak of what's to come.
Sheena Douglass has been a busy lady designing embossing folders to go with some of her wonderful stamps that we already have in our collections. Sheena will be on our screens at Create & Craft on Monday 27th January bringing you not only her folders but lots of her techniques in using them.
Today I have a sample to show you that was easy to put together but one that I loved making, it just felt right to me.
This is using a 5"x 7" embossing folder that goes with the Ageing Beautifully Stamp set. The stamp set is one that gets used time and time again as it is so versatile.
I started by working on a piece of white centura pearl card on the non shinny side and making some splats using my distress stains.
I then used the torn edge, the little stain stamp and the hessian stamp, they were all stamped using gathered twigs distress ink pad.
I cut some kraft card to the size of the embossing folder and with the folder laying open on my desk I took the gathered twigs distress ink pad over the bottom part of the folder. I then placed the right side of the card face down on to the inked surface and ran it through my embossing machine.
I stamped the sentiment from Only Words - From The Heart set on some more centura pearl card and cut it out using Spellbinders Labels Twenty-Eight. I then did some more splats on this pieces and then I used my blending tool around all the edges.
I stamped the dragonfly from the Flying Colours stamps in black ink on kraft card, cut it out and went around it with the gathered twigs.
This was then all mounted on to an 8"x 8" Kraft Card.
I will be back again tomorrow with another DT piece so please do leave me a comment and if you like what you are seeing feel free to pop back.
Ria
Subscribe to:
Posts (Atom)


.jpg)